正文:
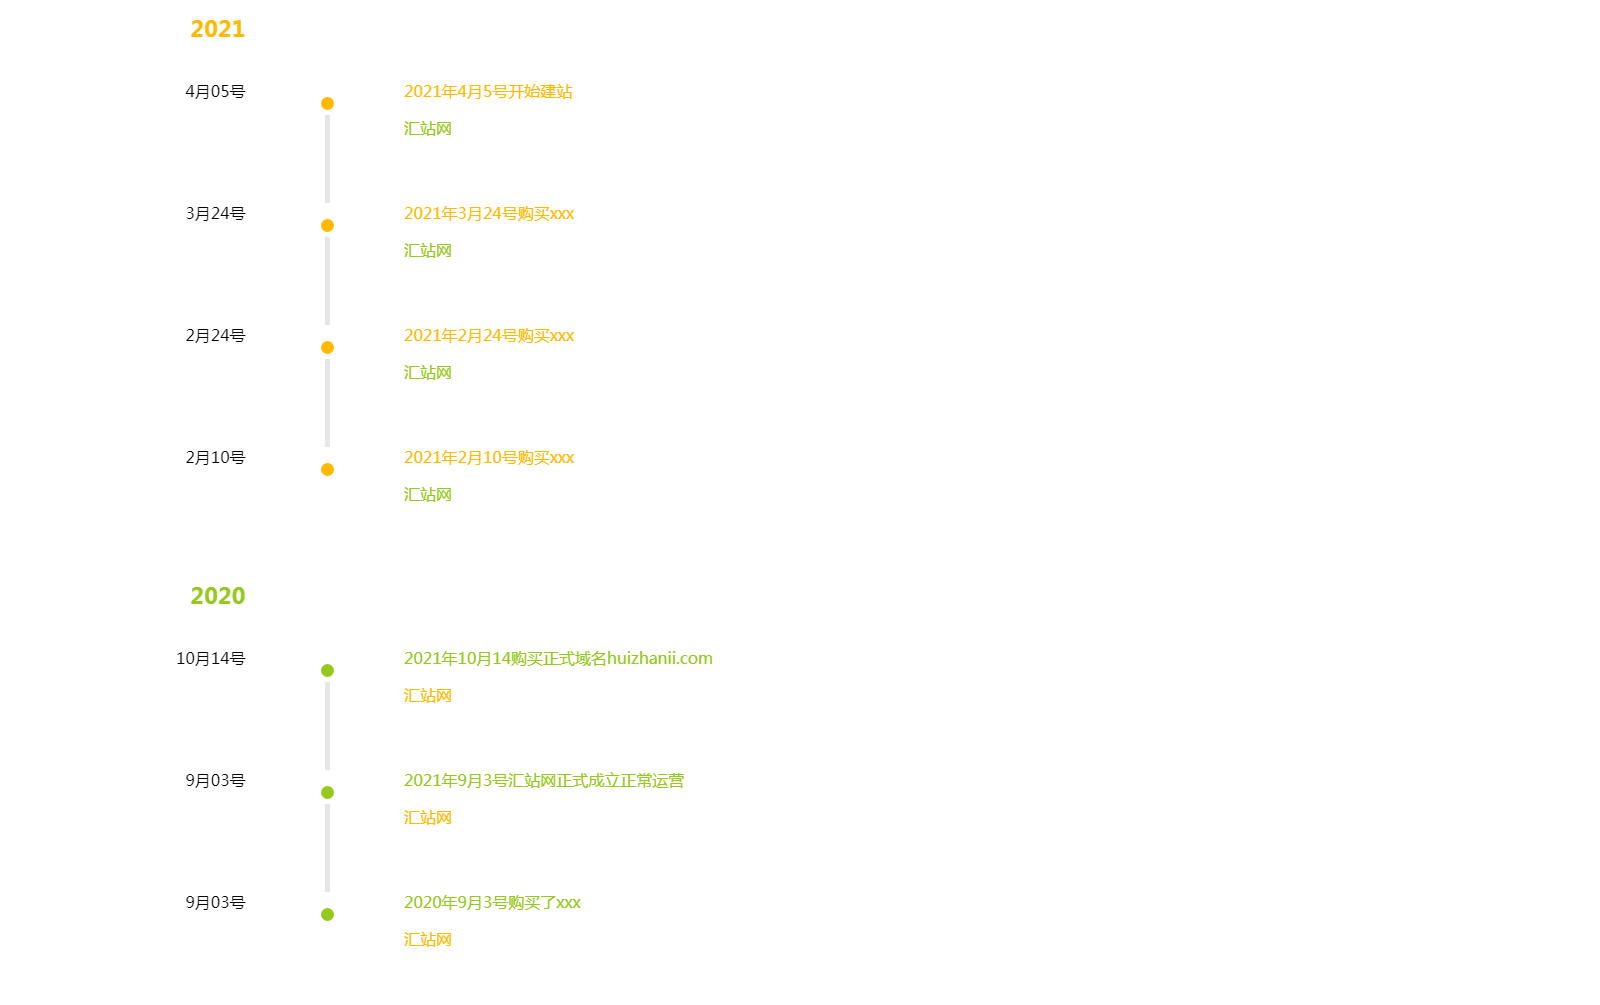
今天要分享的是如何为网站添加一个简单的时光轴页面。时光轴页面使用 HTML+CSS 来实现(CSS 已经整合到了一个文件中,你可以自己提取出来作为单独的文件)。其实时光轴页面并没有太多实际作用,只是为了给自己的网站增添一些特色。另外,你也可以用它来记录自己取得的成就和经历的事情。
效果图展示:
代码如下:
<html>
<head>
<style type="text/css">
.point-time {
  content: "";
  position: absolute;
  width: 13px;
  height: 13px;
  top: 17px;
  left: 20%;
  background: #1c87bf;
  margin-left: -4px;
  border-radius: 50%;
  box-shadow: 0 0 0 5px #fff;
}

.text-red {
  color: #f6393f;
}

.text-blue {
  color: #1c87bf;
}

.text-green {
  color: #95c91e;
}

.text-yellow {
  color: #ffb902;
}

.text-purple {
  color: #d32d93;
}

.point-red {
  background-color: #f6393f;
}

.point-blue {
  background-color: #1c87bf;
}

.point-green {
  background-color: #95c91e;
}

.point-yellow {
  background-color: #ffb902;
}

.point-purple {
  background-color: #d32d93;
}
.content article {
  position: relative;
}
.content article > h3 {
  width: 15%;
  height: 20px;
  line-height: 20px;
  text-align: right;
  font-size: 1.4em;
  color: #1d1d1d;
  padding: 10px 0 20px;
}
.content article section {
  padding: 0 0 17px;
  position: relative;
}
.content article section:before {
  content: "";
  width: 5px;
  top: 17px;
  bottom: -17px;
  left: 20%;
  background: #e6e6e6;
  position: absolute;
}
.content article section:last-child:before {
  display: none;
}
.content article section time {
  width: 15%;
  display: block;
  position: absolute;
}
.content article section time > span {
  display: block;
  text-align: right;
}
.content article section aside {
  color: #3a3a38;
  margin-left: 25%;
  padding-bottom: 15px;
}
.content article section .brief {
  color: #9f9f9f;
}
</style>
</head>
<body>
<div class="content">
  <article>
  <h3><span class="text-yellow">2021</span></h3>
  <section>
      <span class="point-time point-yellow"></span>
      <time datetime="2021-04">
        <span>4 月 05 号</span>
      </time>
      <aside>
        <p class="things"><span class="text-yellow">2021 年 4 月 5 号开始建站</span></p>
        <p class="brief"><span class="text-green">汇站网</span></p>
      </aside>
    </section>
    <section>
      <span class="point-time point-yellow"></span>
      <time datetime="2021-03">
        <span>3 月 24 号</span>
      </time>
      <aside>
        <p class="things"><span class="text-yellow">2021 年 3 月 24 号购买 xxx</span></p>
        <p class="brief"><span class="text-green">汇站网</span></p>
      </aside>
    </section>
    <section>
      <span class="point-time point-yellow"></span>
      <time datetime="2021-02">
        <span>2 月 24 号</span>
      </time>
      <aside>
        <p class="things"><span class="text-yellow">2021 年 2 月 24 号购买 xxx</span></p>
        <p class="brief"><span class="text-green">汇站网</span></p>
      </aside>
    </section>
    <section>
      <span class="point-time point-yellow"></span>
      <time datetime="2021-02">
        <span>2 月 10 号</span>
      </time>
      <aside>
        <p class="things"><span class="text-yellow">2021 年 2 月 10 号购买 xxx</span></p>
        <p class="brief"><span class="text-green">汇站网</span></p>
      </aside>
    </section>
  </article>
        <!--分隔符-->
  <article>
    <h3><span class="text-green">2020</span></h3>
    <section>
      <span class="point-time point-green"></span>
      <time datetime="2020-10">
        <span>10 月 14 号</span>
      </time>
      <aside>
        <p class="things"><span class="text-green">2021 年 10 月 14 购买正式域名 huizhanii.com</span></p>
        <p class="brief"><span class="text-yellow">汇站网</span></p>
      </aside>
    </section>
    <section>
      <span class="point-time point-green"></span>
      <time datetime="2020-09">
        <span>9 月 03 号</span>
      </time>
      <aside>
        <p class="things"><span class="text-green">2021 年 9 月 3 号汇站网正式成立正常运营</span></p>
        <p class="brief"><span class="text-yellow">汇站网</span></p>
      </aside>
    </section>
    <section>
      <span class="point-time point-green"></span>
      <time datetime="2020-09">
        <span>9 月 03 号</span>
      </time>
      <aside>
        <p class="things"><span class="text-green">2020 年 9 月 3 号购买了 xxx</span></p>
        <p class="brief"><span class="text-yellow">汇站网</span></p>
      </aside>
    </section>
</div>
</body>
</html>
使用教程
第一步:登录后台管理系统,选择新建页面或者撰写文章(根据需要选择,通常建议在页面中进行操作)。
第二步:进入编辑页面,点击添加区块,选择格式,然后选择自定义 HTML。将代码粘贴到自定义 HTML 区块中即可完成。
本文章已结束,如转载请注明:汇站网 » 如何在 WordPress 网站上创建一个时光轴页面

 微信扫一扫
微信扫一扫 支付宝扫一扫


